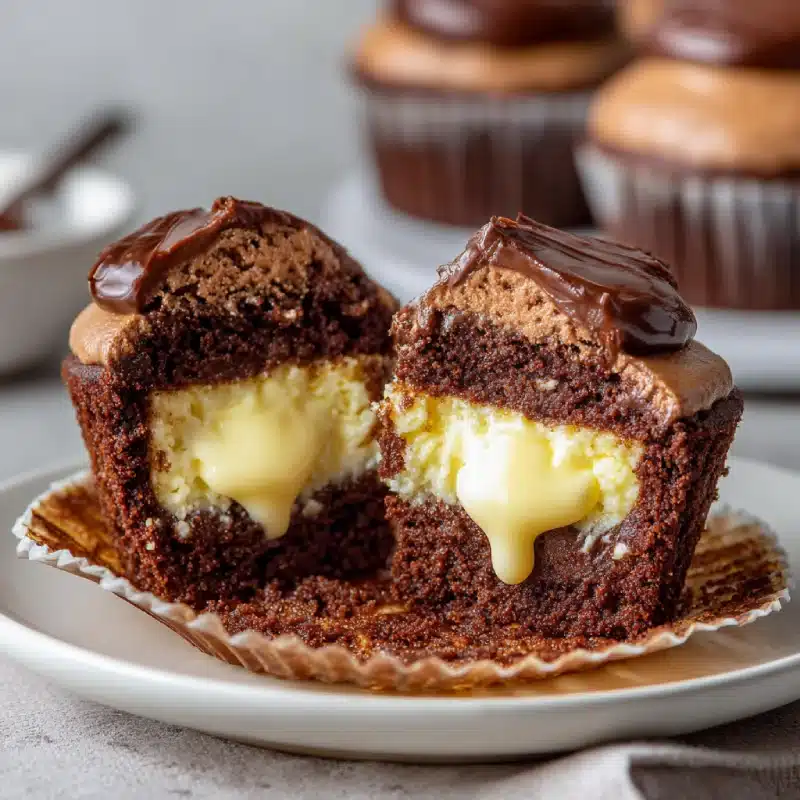
Introduction to Cheesecake-Stuffed Chocolate Cupcakes
As a busy mom, I know how precious time can be, especially when it comes to whipping up something sweet. That’s why I’m excited to share my recipe for Cheesecake-Stuffed Chocolate Cupcakes! These delightful treats are not just a feast for the eyes; they’re a quick solution for a busy day or a perfect way to impress your loved ones. Imagine biting into a rich chocolate cupcake, only to discover a creamy cheesecake center waiting for you. It’s like a little surprise party in every bite!
Why You’ll Love This Cheesecake-Stuffed Chocolate Cupcakes
These Cheesecake-Stuffed Chocolate Cupcakes are a dream come true for dessert lovers! They’re incredibly easy to make, even on the busiest of days. With just a handful of ingredients, you can whip up a batch in no time. Plus, the combination of rich chocolate and creamy cheesecake is simply irresistible. Whether it’s a family gathering or a cozy night in, these cupcakes will surely bring smiles all around!
Ingredients for Cheesecake-Stuffed Chocolate Cupcakes
Gathering the right ingredients is the first step to creating these delightful Cheesecake-Stuffed Chocolate Cupcakes. Here’s what you’ll need:
- All-purpose flour: This is the backbone of your cupcakes, providing structure and texture.
- Granulated sugar: Sweetness is key! It balances the rich chocolate flavor.
- Unsweetened cocoa powder: For that deep chocolate taste, use high-quality cocoa for the best results.
- Baking powder: This helps your cupcakes rise, giving them a light and fluffy texture.
- Baking soda: Another leavening agent that works wonders when combined with acidic ingredients.
- Salt: Just a pinch enhances all the flavors, making your cupcakes taste even better.
- Unsalted butter: Melted butter adds richness and moisture to the batter.
- Large eggs: They bind everything together and contribute to the cupcakes’ fluffiness.
- Vanilla extract: A splash of vanilla elevates the flavor profile, making it more aromatic.
- Buttermilk: This adds moisture and a slight tang, resulting in a tender crumb.
- Cream cheese: The star of the show! It creates that luscious cheesecake filling.
- Powdered sugar: This sweetens the cheesecake filling without adding graininess.
- Vanilla extract (for cheesecake filling): A touch of vanilla in the filling enhances its flavor.
For those looking to switch things up, consider using dark chocolate cocoa powder for a richer flavor. You can also store these cupcakes in the refrigerator for up to three days, making them a great make-ahead treat. If you want to take them over the top, top with whipped cream or chocolate ganache!
How to Make Cheesecake-Stuffed Chocolate Cupcakes
Now that you have all your ingredients ready, let’s dive into the fun part—making these Cheesecake-Stuffed Chocolate Cupcakes! Follow these simple steps, and you’ll be on your way to dessert heaven.
Step 1: Preheat the Oven and Prepare the Pan
First things first, preheat your oven to 350°F (175°C). This step is crucial for even baking. While the oven warms up, line your cupcake pan with liners. This not only makes for easy removal but also keeps your cupcakes looking pretty!
Step 2: Mix the Dry Ingredients
In a large bowl, combine the all-purpose flour, granulated sugar, cocoa powder, baking powder, baking soda, and salt. Whisk them together until they’re well blended. This ensures that the leavening agents are evenly distributed, giving your cupcakes the perfect rise and texture.
Step 3: Combine the Wet Ingredients
In another bowl, whisk together the melted butter, eggs, vanilla extract, and buttermilk. Mixing these wet ingredients separately helps create a smooth batter. It’s like giving your cupcakes a little love before they meet the dry ingredients!
Step 4: Combine Wet and Dry Ingredients
Now, gently fold the wet mixture into the dry ingredients. Be careful not to overmix; a few lumps are okay! Overworking the batter can lead to tough cupcakes, and we want them soft and fluffy. Just mix until everything is combined.
Step 5: Prepare the Cheesecake Filling
In a separate bowl, beat the softened cream cheese, powdered sugar, and vanilla extract until smooth. This creamy filling is what makes these cupcakes special! Make sure there are no lumps for that perfect cheesecake texture.
Step 6: Assemble the Cupcakes
Here comes the fun part! Fill each cupcake liner halfway with the chocolate batter. Then, add a generous spoonful of the cheesecake filling right in the center. Top it off with more chocolate batter until the liners are about three-quarters full. This layering creates that delightful surprise when you bite into the cupcake!
Step 7: Bake the Cupcakes
Pop your cupcake pan into the preheated oven and bake for 18-20 minutes. To check for doneness, insert a toothpick into the center of a cupcake. If it comes out clean or with a few moist crumbs, they’re ready to come out!
Step 8: Cool and Serve
Once baked, let the cupcakes cool in the pan for about 5 minutes before transferring them to a wire rack. Cooling is essential; it allows the flavors to settle and enhances the overall taste. Trust me, waiting just a bit will be worth it!
Tips for Success
- Use room temperature ingredients for a smoother batter.
- Don’t skip the cooling step; it enhances flavor and texture.
- For a fun twist, add chocolate chips to the batter!
- Keep an eye on baking time; ovens can vary.
- Store leftovers in an airtight container to maintain freshness.
Equipment Needed
- Cupcake pan: A standard 12-cup pan works perfectly, but you can use silicone molds for easy removal.
- Mixing bowls: Use at least two—one for dry and one for wet ingredients.
- Whisk: A simple whisk or electric mixer will do the job.
- Measuring cups and spoons: Essential for accurate ingredient amounts.
- Cooling rack: Helps cool cupcakes evenly, but a plate works in a pinch!
Variations
- Gluten-Free: Substitute all-purpose flour with a gluten-free blend for a delicious gluten-free option.
- Vegan: Use plant-based butter, flax eggs, and dairy-free cream cheese to create a vegan version of these cupcakes.
- Flavor Infusions: Add a teaspoon of espresso powder to the batter for a mocha twist or a splash of orange zest for a citrusy kick.
- Nutty Delight: Fold in chopped nuts like walnuts or pecans into the chocolate batter for added crunch and flavor.
- Mini Cupcakes: Make bite-sized versions by using a mini cupcake pan; just reduce the baking time to about 12-15 minutes.
Serving Suggestions
- Pair these cupcakes with a scoop of vanilla ice cream for a delightful contrast.
- Serve with a drizzle of chocolate ganache for an extra indulgent touch.
- Accompany with fresh berries to add a pop of color and freshness.
- For drinks, consider a rich coffee or a glass of cold milk.
- Present on a decorative platter, garnished with mint leaves for a beautiful display.
FAQs about Cheesecake-Stuffed Chocolate Cupcakes
As you embark on your baking adventure with these Cheesecake-Stuffed Chocolate Cupcakes, you might have a few questions. Here are some common queries I’ve encountered, along with helpful answers!
Can I make the cheesecake filling ahead of time?
Absolutely! You can prepare the cheesecake filling a day in advance. Just store it in the refrigerator until you’re ready to assemble the cupcakes. This can save you time on a busy baking day!
What can I use instead of buttermilk?
If you don’t have buttermilk on hand, don’t worry! You can make a quick substitute by mixing one tablespoon of vinegar or lemon juice with one cup of milk. Let it sit for about 5 minutes, and you’re good to go!
How do I store leftover cupcakes?
To keep your Cheesecake-Stuffed Chocolate Cupcakes fresh, store them in an airtight container in the refrigerator. They’ll stay delicious for up to three days. Just remember to let them come to room temperature before serving for the best flavor!
Can I freeze these cupcakes?
Yes, you can freeze these cupcakes! Just make sure they are completely cooled. Wrap them tightly in plastic wrap and then place them in a freezer-safe container. They can be frozen for up to three months. Thaw them in the fridge overnight before enjoying!
What’s the best way to serve these cupcakes?
For an extra special touch, serve your cupcakes with a dollop of whipped cream or a drizzle of chocolate ganache. Fresh berries on the side add a lovely contrast and make for a beautiful presentation!
Final Thoughts
Making these Cheesecake-Stuffed Chocolate Cupcakes is more than just baking; it’s about creating sweet memories with loved ones. Each bite is a delightful blend of rich chocolate and creamy cheesecake, bringing smiles to faces young and old. Whether you’re celebrating a special occasion or simply treating yourself after a long day, these cupcakes are sure to brighten your mood. Plus, they’re easy enough to whip up on a whim! So, roll up your sleeves, gather your ingredients, and let the joy of baking fill your kitchen. Trust me, you won’t regret it!

