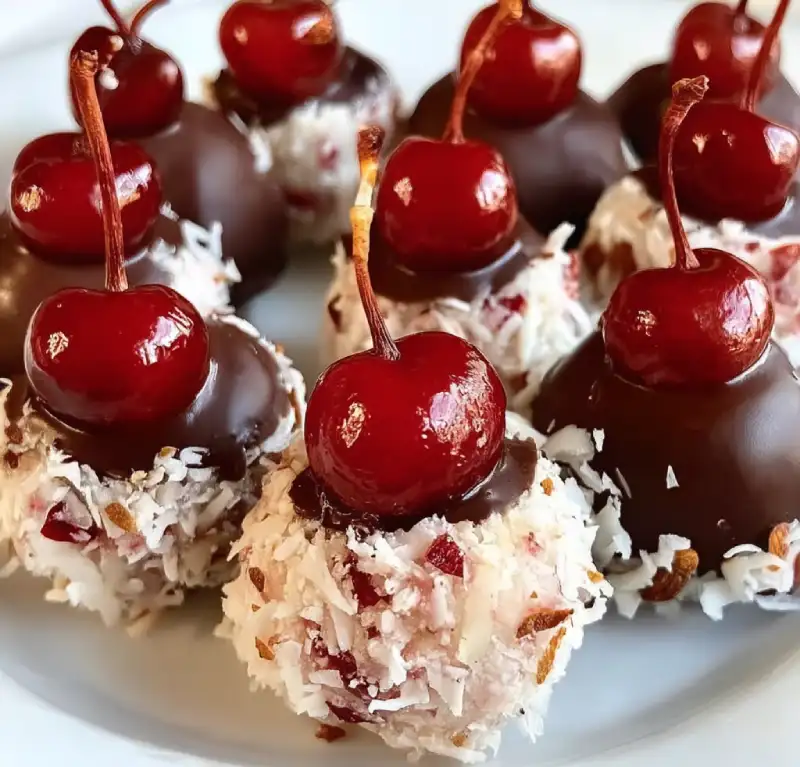
Introduction to Festive Cherry Bombs
As a busy mom, I know how important it is to find quick and delightful treats that can light up any celebration. That’s where my Festive Cherry Bombs come in! These little gems are not just a feast for the eyes; they’re bursting with flavor and fun. Imagine the sweet, juicy cherries wrapped in rich chocolate, creating a treat that’s sure to impress your loved ones. Whether it’s a birthday party, holiday gathering, or just a cozy family night, these cherry bombs are the perfect solution to add a touch of joy to your day!
Why You’ll Love This Festive Cherry Bombs
These Festive Cherry Bombs are a dream come true for busy moms like us! They’re incredibly easy to whip up, taking just 40 minutes from start to finish. The combination of sweet cherries and rich chocolate creates a taste explosion that will have everyone asking for seconds. Plus, they’re no-bake, which means less time in the kitchen and more time enjoying the celebration with your loved ones!
Ingredients for Festive Cherry Bombs
Gathering the right ingredients is the first step to creating these delightful Festive Cherry Bombs. Here’s what you’ll need:
- Fresh cherries: The star of the show! Choose ripe, juicy cherries for the best flavor. They add a natural sweetness that pairs perfectly with chocolate.
- Dark chocolate chips: Rich and decadent, these chips provide a luscious coating. You can use semi-sweet or bittersweet, depending on your taste preference.
- White chocolate chips: These add a beautiful contrast and a touch of sweetness. If you’re feeling adventurous, try using flavored white chocolate for a twist!
- Sprinkles: A fun way to add color and festivity! Choose sprinkles that match your celebration theme, or go wild with a mix of colors.
- Coconut oil: This helps the dark chocolate melt smoothly and gives it a nice sheen. You can substitute with vegetable oil if you prefer.
How to Make Festive Cherry Bombs
Now that you have your ingredients ready, let’s dive into the fun part: making these Festive Cherry Bombs! Follow these simple steps, and you’ll have a delightful treat that’s sure to impress.
Step 1: Prepare the Cherries
Start by washing your fresh cherries under cool water. This step is crucial because clean cherries taste better and look more appealing. Once they’re clean, use a cherry pitter or a small knife to remove the pits. Fresh cherries are the heart of this recipe, so make sure they’re ripe and juicy for the best flavor!
Step 2: Melt the Dark Chocolate
Next, grab a microwave-safe bowl and add your dark chocolate chips along with the coconut oil. Microwave them in 30-second intervals, stirring in between until the mixture is smooth and glossy. This method helps prevent burning. If you want a silky texture, make sure to stir well after each interval!
Step 3: Dip the Cherries
Now comes the fun part! Dip each cherry into the melted dark chocolate, ensuring it’s fully coated. You can use a fork or your fingers for this. Just make sure to let any excess chocolate drip off before placing them on the baking sheet. This step is where the magic happens, turning simple cherries into chocolate-covered delights!
Step 4: Set the Cherries
Once dipped, carefully place the chocolate-covered cherries on a baking sheet lined with parchment paper. This prevents them from sticking and makes cleanup a breeze. Make sure to leave a little space between each cherry so they don’t stick together as they set.
Step 5: Melt the White Chocolate
In a separate bowl, repeat the melting process with the white chocolate chips. Use the same microwave method, stirring every 30 seconds until smooth. The white chocolate adds a beautiful contrast to the dark chocolate, making your chocolate-covered cherries even more festive!
Step 6: Drizzle and Decorate
Once your white chocolate is melted, it’s time to get creative! Drizzle the melted white chocolate over the dark chocolate cherries. You can use a spoon or a piping bag for more control. While the chocolate is still wet, sprinkle your colorful sprinkles on top. This adds a fun pop of color and makes them look extra special!
Step 7: Chill and Serve
Finally, pop the baking sheet into the refrigerator for at least 30 minutes. This allows the chocolate to set properly. Once they’re chilled, serve your Festive Cherry Bombs on a beautiful platter. They’re best enjoyed cold, and I promise they’ll be a hit at any gathering!
Tips for Success
- Use fresh, ripe cherries for the best flavor and texture.
- Don’t rush the melting process; stir often to avoid burning the chocolate.
- Experiment with different types of sprinkles to match your celebration theme.
- For a fun twist, try adding a pinch of sea salt on top of the chocolate.
- Make these a day ahead for stress-free entertaining!
Equipment Needed
- Microwave-safe bowl: Any heatproof bowl will do if you don’t have one.
- Fork or tongs: Use these for dipping cherries; chopsticks work too!
- Baking sheet: A plate can substitute if you don’t have one.
- Parchment paper: Wax paper is a good alternative for easy cleanup.
Variations
- Nutty Delight: Add crushed nuts like almonds or hazelnuts on top of the chocolate for a crunchy texture.
- Fruit Fusion: Swap cherries for strawberries or raspberries for a different fruity twist.
- Dark Chocolate Lovers: Use only dark chocolate for both coatings for a richer flavor.
- Vegan Option: Choose dairy-free chocolate chips and coconut oil to make these treats vegan-friendly.
- Spiced Up: Add a sprinkle of cinnamon or chili powder to the melted chocolate for a unique flavor kick!
Serving Suggestions
- Pair your Festive Cherry Bombs with a scoop of vanilla ice cream for a delightful dessert combo.
- Serve alongside a refreshing fruit salad to balance the sweetness.
- For drinks, consider a sparkling lemonade or a glass of bubbly to elevate the celebration.
- Present them on a colorful platter with fresh mint leaves for a pop of color.
FAQs about Festive Cherry Bombs
Can I use frozen cherries for this recipe?
While fresh cherries are best for flavor and texture, you can use frozen cherries in a pinch. Just make sure to thaw and drain them well before dipping to avoid excess moisture!
How long can I store Festive Cherry Bombs?
You can store your chocolate-covered cherries in an airtight container in the refrigerator for up to three days. They’re perfect for making ahead of time!
Can I customize the sprinkles?
Absolutely! Feel free to use any sprinkles that match your celebration theme. From holiday colors to birthday fun, the options are endless!
What if I don’t have coconut oil?
No worries! You can substitute coconut oil with vegetable oil or even butter. Just remember, the goal is to achieve a smooth melting consistency.
Are these Festive Cherry Bombs suitable for kids?
Yes! These treats are a hit with kids. Just keep an eye on the chocolate melting process, and let them help with the sprinkles for some extra fun!
Final Thoughts
Creating Festive Cherry Bombs is more than just making a treat; it’s about sharing joy and laughter with those you love. The process is simple, yet the results are nothing short of spectacular. Each bite is a delightful explosion of flavors that brings smiles to faces, young and old alike. Whether you’re celebrating a special occasion or just want to brighten up a regular day, these cherry bombs are sure to do the trick. So gather your loved ones, whip up a batch, and let the festivities begin!

